Tutorials
Internet & the Routing Process
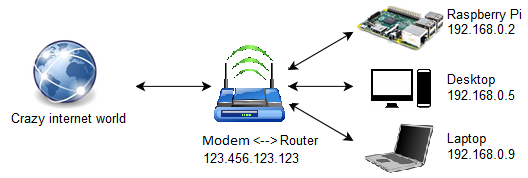
Everything connected on the internet has a unique name known as an IP address. Basically 2 IP addresses actually. One is called an external IP address which the Internet world sees and is given to you by your Internet Service Provider (ISP). It's called an external number because it's the IP address that's outside of your router. A device that's connected to the router is then assigned an internal IP address and usually looks something close to 192.168.0.1
This 2 IP address configuration means a bit of work is required to make sure the DNS server requests are pointed to the correct device on the router's network. In other words .. when someone types in camshaftpi.com into their browser, it sends out a request to a bunch of DNS servers to find where this request should go to. Eventually, Namecheap's DNS server will find that camshaftpi.com should point to my external IP address (example: 123.456.123.123). It knows to do this because I bought my domain name (camshaftpi.com) from Namecheap and typed in my external IP address as the A Record, i.e. where camshaftpi.com requests should go.
Once the request links the domain name to my external IP address, it still needs to find the web files. Linking external IPs to my Raspberry Pi's internal IP is called 'port forwarding' and can be setup by connecting into your router by typing its default IP address into your browser. Just Google your router's brand to look into how to do this.
After the router finds the Raspberry Pi, Nginx takes over. Nginx is a web server program that listens for domain requests and points the user to the web files stored on the Pi. Please see the Nginx page.
Here is how the Internet process works from the point where your computer makes the request to view camshaftpi.com to how the information is displayed on your browser.
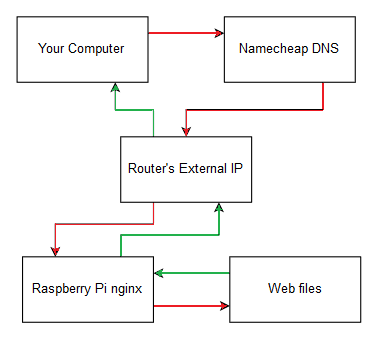
I put the web files separate to the 'Raspberry Pi Nginx' block because the files could be anywhere that's accessible by the Pi, for example external hard drive or Dropbox files.
File Organization & Maintenance
Here is what my website looks like. All of the html, css, images, and js files are in the directory shown. Nginx points to index.html which is the homepage 'camshaftpi.com'. The rest of the files in the folder and subfolders can be navigated to using the URLs /example.html or images/example.png.
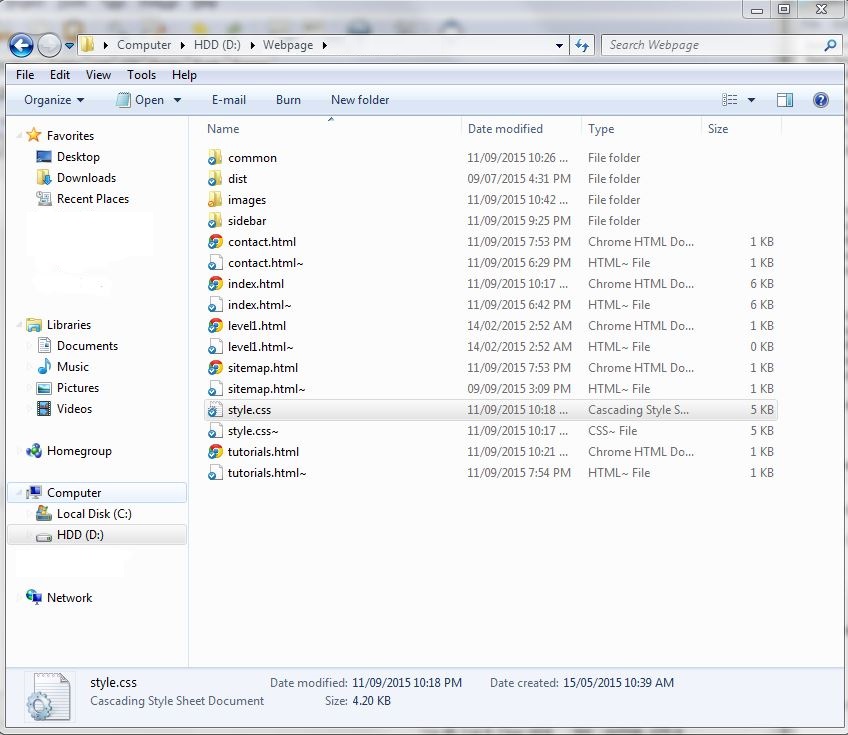
The website files. This whole folder is linked to the internet using nginx, while the homepage is index.html.
Well organized files and folders makes it easy for the user and yourself to navigate through the pages and links on the web page; plus there's a lesser chance you'll mess up directory names.
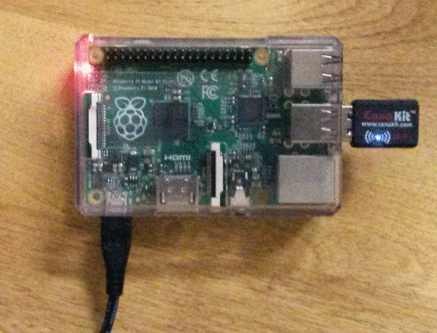
The fully operating Raspberry Pi that hosts this website.
I have found that the most difficult part of hosting the website is keeping it functional. Many things can go wrong that will make the site be down, especially on a Raspberry Pi. Everything from power outages to computer freezing can cripple the whole site. I am able to remote into the Pi using SSH (secure remote terminal access protocol) assuming the Internet is still working. Unfortunately, the Internet on the Pi tends to fail. Thus, I set up a Python script that will check connectivity every ten minutes (using crontab) and restart the WiFi adapter if there's a problem. This has seemed to work so far; if problems persist I'll set a good ol fashioned Pi reboot every day, or if there's a problem.
I am also able to edit my Internet files remotely using Box.net cloud storage. I chose Box because there was an easy tutorial to set it up on the Pi and it's high capacity. It's made it very easy to add/edit web pages from any computer and anywhere with an Internet connection.
Another problem is changing external IP addresses. Typically you have to pay your ISP a little extra to get a static IP address, which means it never changes. I don't want to do that. So, I set another Python script that pings the web which replies with its IP address. The script copies the address and sends it to my site's email address, [email protected] which is actually [email protected]. When I get this email, I change Namecheap's A Host record setting to this new address. When a new address is formed, the site will have a ~30min downtime for the settings change to propagate. This means I have to change the settings ASAP to avoid further down time. I believe Namecheap has a dynamic IP capability, but I haven't looked into it yet. Hopefully it will work for the Pi.
One neat aspect about the web site organization is the CSS style files and the header, footer, and sidebar structure. I have a main CSS file which dictates what the page looks like in terms of page sizing, fonts, margins, button style, and more. All the pages reference this file so everything is consistent. Also, every .html file uses a header, footer, and sidebar. That means if I change one thing in those structures I'd have to change every file to match the look. Instead I use #include function to input the .html code of the header into the page you're on. Meaning, I have one standard file for the header, footer, and sidebar.
Learning
I primarily used w3schools.com for learning web page scripts. This is a fantastic resource for learning all types of web tools, scripts, and design practices. I can say from my experience, the relevant skills for web-building should be developed in this such order:
- HTML basics
- CSS basics
- JavaScript
- Web hosting
I actually accomplished the last step first. This was because I always wondered how a website could be hosted from home, so shortly after obtaining my Raspberry Pi I learned how to do it. However, once accomplished, I had no website to host. Now I am slowly adding sections and features to this site as I learn more about building web pages.
Common Downtime Issue - solved!
Another issue was getting a static internal IP address linked to the Pi instead of the default dynamic setting. Every week or so a new internal IP would be assigned to the Pi (ex. 192.168.0.11 changes to 192.168.0.5). This means any port forwarding settings pointing to the Pi would no longer work. I couldn't remote access because the Port Forward no longer works, so I'd have to find out the IP address using the Pi or the client list on the router, and set the new forward IP address in the router. I didn't have any warning triggers set for this change so there could be a day or two of downtime before I even notice that the site is down.
To solve this I set a static internal IP in the Pi's terminal. Basically, assign a set address for the Pi to the router manually. This can be accomplished using a few lines of configuration code and a system reboot. Forum for this found here.
Home